Friday, August 31, 2012

Nail Ideas: Nail Wraps!

I have to confess - ever since I started dabbling in simple nail art, I'd thumbed my nose at nail wraps and stickers. After all, I can always recreate the designs myself, right?

Wrong.
I never realized that there can be a million and one things that make it impossible to do nail art until I started on a preparatory course for my upcoming bar exam. Ever since the course started, I've only done nail art on a few occasions. Most of the time, I just slap on a polish and wear it for the entire week or until it chips. And you know me, wearing a plain color for an entire week can really bore me to tears.

At times like this, I've really got nail wraps to thank:


Tada! Fancy nails in under 5 minutes!
Please pardon the mangled looking edges for some of the nails. I did some experiment with the wraps on different nails for this review.

Application is really simple and you can do all ten of your nails in under 10 minutes - no rushing necessary. Here are the instructions on the packaging (in my own words because I've misplaced the cover >.< ):

  1. Remove plastic film on top of wrap
  2. Find a strip of nail wrap that fits on the nail.
  3. Carefully peel the nail wrap off the packaging.
  4. Position the nail wrap on your nail (you can carefully lift it up and reposition it if you got it wrong).
  5. Smooth the nail wrap on your nail and remove any wrinkles or bubbles.
  6. File off the excess nail wrap at the tips. 
In addition to that, I would recommend trimming the nail wrap with a pair of scissors to fit your nails before step 3. It will give a neater and crisper edge near the cuticles - see ring finger. 
I've tried to trim the nail wrap after putting it on the nail and it didn't turn out so pretty - see middle finger. It might be neater if you use a cuticle cutter but I'm not too sure about that.
I've also tried to get a neat line near my cuticles by using my usual clean-up method (using a brush and acetone). They did say the nail wrap can be removed using nail polish remover so I thought I would give it a shot. Unfortunately, that didn't work too well either. The acetone dissolved some of the wraps and gave it a fuzzy edge - see index finger.

The nail wraps are relatively shiny on their own but I would not recommend using a topcoat to seal it or to give it extra gloss.
I've tried Seche Vite on my pinky and it mangled up the design near the tips. 
I've also tried a non-quick-dry topcoat on my thumb and the nail wrap pretty much disintegrated into little bits on my nails - crackle/shatter-style. o_O

Minutes after I've applied the nail wraps, I had a horrible itch on my back. Of course, I had to scratch it. ;) I was a little bummed when the corners of the nail wrap lifted up easily. A few hours later, however, I was quite surprised when I could scratch the itch without any trouble. The wraps held on and did not lift up at all. 
If I asked you to scratch my back could you manage that
Like yikky yea Travie I can handle that
- Stereo Hearts
Wear time was quite good.
The nail wraps held on for at least 3 days before there was visible tip wear. 
The pinky with the Seche Vite didn't fare as well and chipped majorly on the third day.

Removal was a piece of cake.
I was picking at the chip on my pinky when I realized I could peel off the wrap really easily.
I did try the suggested removal method - nail polish remover. I soaked a cotton pad in acetone and pressed it against my nail for about 10 seconds and everything came off neatly in one swipe. There was only a bit of black left at the sides of the nail.
Needless to say, I proceeded to peel off the remaining wraps. I then gave them a cursory wipe with acetone to remove any sticky residue.

Overall, I must say I'm really impressed with these nail wraps and would definitely recommend them to those who don't have time for DIY nail art.
You can find a wide range of nail wraps here at KKCenterHK. You can find the design I used here.

Have you tried nail wraps before? What do you think of them?

xoxo,
mich

**Product provided for our honest review. Please see our disclosure policy for more information.**

Wednesday, August 29, 2012

Enchanted Polish: Electric Daisy

Today I have swatches of one of Enchanted Polish's new holo colors to show you!
I received this in my mail a few days ago and I had been itching to try it ever since. But as always, it just  has to rain when you really need the sun. :|| It has been raining here for several days now and I decided to bust out the polish when the sky cleared up slightly today.


Electric Daisy. 3 coats (over Poshe Strengthening base coat, no top coat)
A soft slightly frosty bubblegum pink with subtle linear holographic effect. I'm quite surprised by how bright yet soft the pink looks. Feminine yet with a touch of girlish fun. I also like how clean it looks on my hands. ^_^

The holo is slightly stronger in real life but I couldn't photograph it properly with the overcast sky.
Here's a slightly more angled shot to get the holo:


And that was literally the last shot I got before it rained again. Ah wells. I'm gonna have to re-swatch this someday.

Formula of Electric Daisy is good. It was of the right consistency and didn't require any special base coat. It applied evenly right at the first coat and builds up nicely in 2 or 3 coats. Although the color is slightly frosty/pearly, I didn't have much problems with brushstrokes. I tried adding topcoat and it didn't appear to affect the holo too. :rainbow

So what do you think? Are you a holo fan too?

You can find Enchanted Polish on Etsy (Chelsea's also on facebook!). You can also get your Enchanted Polish fix from our local stockist, Mei Mei's Signatures, here!

xoxo,
mich

**Product was provided for our honest review. Please see our disclosure policy for more details.**

Saturday, August 25, 2012

Cult Nails: I Got Distracted

A few days ago, I nearly shrieked out loud when a close friend (non-polish-addict) texted me: "U want to try this nail polish not arh? My cousin passed to me but I think more your style! 'I Got Distracted' from Cult Nails. Dunno where she got from."
Having missed the new Coco's Untamed collection because of my self-imposed no-buy, I was more than thrilled and replied "omg yes please!!!". In my heart, I was literally shouting: YES OF COURSE! :e

Here's the little beauty in the bottle:


I Got Distracted. 2 coats.
A blackened emerald green jelly filled with bright green glitters and smaller holographic glitters.
This was literally love at first sight. I couldn't tear my eyes away because it was sooo sparkly! The green glitters are so bright and the holo was just dancing manically against the dark inky base. For some reason, it reminds me of a spectacular cosmic explosion. It's really a sight to behold! :L


I tried my best to do a blur shot of my nails to capture the holo but my camera insisted on focusing before taking a picture. It never was that insistent when I do my other swatches. Meh. :||
Anyway, here are some bottle shots to give you a rough idea how holo the glitters are:


Application was great. The formula is slightly thicker than the usual creme polishes because it is loaded with glitter but it applies smoothly and easily on the nails. It is a potential one-coater (I did two because I wasn't careful with application) and there is no need to fish around for the green hex glitters. Awesome. As with other glitter bombs, it dries gritty. I definitely recommend a top coat for a smooth shiny finish. It also helps to bring the rainbow sparkles to life! :rainbow

So, what do you think of I Got Distracted?
I think I'm definitely getting this in my next order. As my friend puts it, this is right up my alley! 8)

xoxo,
mich

Wednesday, August 22, 2012

Nail Ideas: Roses and Polka Dots

Just last saturday, we celebrated our grandma's birthday with a buffet dinner at Tung Lok Seafood. The food was so-so but there was a huge variety of dishes so I went home with a really full stomach anyway.

I decided to do a vintage and girly mani for the occasion so I went for some polka dots and roses. However, since I was intending to wear a grey bubble dress with a white short-sleeved jacket, I decided to use black as my base color to match my outfit. Yes, I have a pretty awesome grandma who's cool with black (generally viewed as an inauspicious color) - heck, she even lets me wear black for Chinese New Year! I love my grandma! <3


Please excuse the sad looking 'leaves'. I overestimated the time I had left before the dinner and end up rushing to finish this mani.

I had a few compliments from my aunts and cousins (the boys were busy eating) and I have to admit I feel pretty chic with my outfit and nails! :$

The colors I used for this mani:
Black - Nails Inc Black Taxi
White - OPI Alpine Snow
Light Purple - a-england Guinevere
Dark Purple - a-england Elaine
Teal Green - China Glaze Exotic Encounter

What do you think of this mani?

xoxo,
mich

Monday, August 20, 2012

China Glaze: Halloween 2012 - Wicked

It's August! Who's ready for Halloween?
Not me. Well, I wasn't until I realized that a local polish seller already brought in China Glaze's Halloween 2012 collection - Wicked! :v

I had wanted to grab the whole collection but my wallet threw a huge temper and threatened to go on strike. :f In the end, we reached a compromise and I walked away with two out of six polishes: Immortal and Cast A Spell.


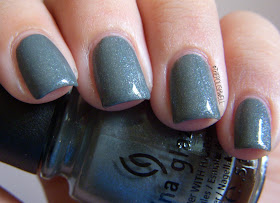
Immortal. 3 coats.
A beautiful slate grey with a hint of sage green. Greys do not usually catch my eyes so I wasn't particularly interested in Immortal initially but I was blown away when I saw the swatches online. It is filled with tiny silvery flakes and, you'll never guess, blue and pink/fuchsia shimmer! It is not that obvious in my pictures but the shimmers really come to life when they catch the light. Super pretty. <3


And I won't lie, I bought this partly also because it reminds me of:


Beautiful song, beautiful polish *happy sigh* :d

While I was looking at swatches of Immortal online, I read that this may be similar to Claw Polish's Phantom. They have the same silver, blue and pink shimmery particles but I *think* Immortal is a shade greener and several shades lighter. (Read: yes, it is justified to have both! ;) )


Cast A Spell. 2 coats (potential one-coater!)
A blackened olive green base filled packed with lime gold flecks. Now this is a stunner. China Glaze definitely did not scrimp on the gold flecks - they are enough to send a gold-lover like me into a frenzy. They look absolutely striking against the dark base! I also love that sexy dark-at-the-edges look. Be still, my heart. :L

See what I mean by "packed"?
The formula for these are quite different.
Immortal was the trickier one. It is thin and tends to pool at the edges of the nail. Next time, I'll be sure to let the polish dry a little more in between coats.
On the other hand, the formula for Cast A Spell was divine. The consistency is just right and the polish practically flows onto the nails by itself. It is also very pigmented and if you're careful, you can just get away with one coat.

So, are you in the mood for Halloween yet? :brow
Which polish from Wicked are you eyeing?

xoxo,
mich

p.s. you can view swatches of the other colors in this collection at A Lacquered Affair or at Happyberrynaiad.

Sunday, August 19, 2012

Of Nail Mails and Hauls...

It's Swatching Sunday!!
Well, it was supposed to be... until Mother Nature decided it should be Storm Sunday instead - and the thunder rumbled in agreement just as I finished typing that. Freaky. :~

Since it is way too dark for me to get decent pictures on my camera, I've decided to do a haul update and show you the nail mails that I've received since the last haul post in.... May (can't believe it was so long ago)!

So, here we gooooo~

L-R: Brummingbird holo top coat, Essence Choose Me, Fingerpaints Easel-y Entertained, Spoiled Plastic Flamingo
These are the awesome polishes that I've won from @brummingbird's nail art contest on Instagram! You can see the design I did here.
The bottle with the adorable label is a spectraflair topcoat made by Laura herself. I've tried it on one nail and it was... *wow* intense! :o :rainbow She also makes some pretty cool polishes. You can find her etsy shop here.

L-R:  Lynnderella Nosegay, Glitter Gal Lizard Belly and Kiko #255
I also met up with my friend sometime in June to collect these pretties! I feel a little embarrassed that I have left them with her for so long! :$ She was also really nice to help me get the Kiko on her Euro holiday trip! Thank you, babe! :k
You can see my swatches of Nosegay here.

L-R: Essence Midnight Date / City that Never Sleeps, Michelle M33, A38, 55
Jayo, Cherily and I had another stayover at our friend's house towards the end of June and I collected these from Cherily! She was in town a few days before that and kindly helped me grab some of the local Michelle polishes to try. I've worn each of them as a full mani at least twice now. That's really saying something considering that I still have quite a few untrieds in my stash. :i

In July, I...
actually survived a whole month without a single new polish! woohoo~ :mj
That must be a personal record for me ever since I've started this little hobby of mine. I'm actually pretty impressed with myself! xD

Anyway, the cold turkey didn't last long and here's what my mail lady brought for me in August:

L-R: Gosh Rainbow, Gosh Holographic, MaxFactor Fantasy Fire
Now, I hardly need to introduce these, do I? I was lucky enough to be the winner of The Nailasaurus' giveaway - and even luckier to win the set of HTFs! I've heard so much about these polishes but never had hopes of owning them myself. As you can imagine, I literally jumped for joy when I saw the email she sent! I may or may not have shrieked as I jumped. Heh. :r

L-R: NailTek Foundation II, China Glaze I'm Not Lion, Exotic Encounter, I Herd That, Cast A Spell, Immortal, OPI Alpine Snow
So, the giveaway prizes didn't exactly count towards my no-buy, right? But these China Glazes definitely do! After going cold turkey for a month, I broke my no-buy in a huge way by hauling more than 5 polishes at one go from a local etailer! Apparently, all it needed was a 10% discount for all hell to break loose. So much for a polish-free July! :||

L-R: a-england Elaine, Galahad, Guinevere
Our mail lady also delivered our a-england purchases from their recent July promo - the 5-day Mythical Fair! You know me. I'm a relatively huge a-england fan. It would not have been humanely possible for me to miss this chance to grab some of the shades I'd been eyeing. And so, I caved in. Yet again. :||

And that's not all!
I am expecting at least 2 other polishes this month - Butter London All Hail the Queen and Cult Nails Time Traveller. I've also splurged on another gigantic order but that will only be coming 3 weeks later. >.<
On top of that, I have also spent some money on a few polish-related orders. (If all goes well, I hope it will be in time for our blog-anniversary in October! ;) )

The moral of the story?
Going cold turkey is not a viable long-term solution at all. :ice

So what have you hauled recently? :brow

xoxo,
mich

Wednesday, August 15, 2012

Nail Ideas: Back to School Nails!

I was writing a short note on a little piece of paper last week when I noticed that the design on the paper was really adorable! There were numbers printed randomly in different colors... something like this:


Pastel numbered nails! I started with a white base color before painting the numbers using a small nail art brush. As you can see, I definitely need more practice with my brush. Some of the numbers look atrocious! I swear don't usually write like this. lol! xD

Apart from the light purple (China Glaze Light As Air), the rest of the pastel colors were mixed using white and some other colors (eg. China Glaze For Audrey, Electric Beat, Happy Go Lucky). I topped the nails with a layer of China Glaze Fairy Dust before sealing it with a top coat.

Since the numbers reminded me a little of school, I decided to enter my design into a nail art contest on Instagram held by Casey (@dulllikeglitter):

Yup! That's the paper I was talking about. Isn't it cute? ^_^
So what do you think of this design? Yay or nay?

xoxo,
mich

Monday, August 13, 2012

Glitter Gal: Twisted Jealousy

More duochromes? Yes, please!!

Not long ago, Glitter Gal released a premium range of 6 duochromes to satisfy our never-ending need for color-shifters.
Our Duo Chromes are quick drying, high gloss nail polishes which are long lasting, chip resistant and have a multi-dimensional metallic special effect which shows a “Metallic Chrome” like finish that changes colour when viewed from different angles. Truly Captivating.
- Glitter Gal
To top it all off, the duochromes are all 5-free - containing no TFR, Camphor, Formaldehyde, DPB and Toluene! This must be the most harmless polish I have in my collection! :o

When I first heard about the Glitter Gal Duo Chromes, I thought they were the Shade Shifters, also released not too long ago. However, it turns out that they are two completely different collections:
"Both the Shade Shifters and Duo Chromes are “5 Free”. The main difference is the Shade Shifters are more opaque and can be worn either alone or over another colour. The duo chrome, whilst can be worn alone, are really designed to be worn over black, like a top coat, to create a brilliant deep colour."
- Glitter Gal
So, as you can imagine, I was really excited and honored when I was contacted to do a review for one of the duochromes!

Had to include a shot of the box - looove the chic packaging!
And this was the beauty that came in the box:


Twisted Jealousy. 1 coat over black.
A duochrome that shifts from olive green to a chocolate brown. Honestly, I wasn't particular impressed with the shade in the bottle. But, boy, did it blow my mind off when I put it on. Is it the green? Is it the brown? Nah, they are not my colors (I hardly have any olive greens or browns!) but when you put them together, I fall inexplicably in love. :L I haven't seen anything like this before! I also love that the color-shift is very strong. And the name? Absolutely fitting. Great job, Glitter Gal! :tup

Because I went trigger happy with my camera, here's a shot with more greens...


And a shot with more browns...


I did my best trying to capture the colors but they are more vivid and the color-shift is much stronger in real life.

Application was excellent. Like the Ozotic 505, the formula is slightly thin and flows nicely on the nails. The brush was also easy to control and I hardly needed any clean up. It dried glossy but I added another layer of top coat anyway - there's never too much shine, is there? ;)

In any case, If you are a fan of duochromes, Twisted Jealousy is a unique shade that will be an interesting addition to your collection. It is available on Glitter Gal for AUD$17.95 or you can purchase it from our Singapore stockist, Mei Mei Signatures, for S$24.50 each.

So, what do you think of Twisted Jealousy?
Oh, and you can check out swatches of other colors from this collection by local bloggers here or you can see Michelle's swatches at Cosmetic Cupcakes.

xoxo,
mich

**Product provided for our honest review. Please see our disclosure policy for more information.**

Saturday, August 11, 2012

Ozotic: 730

If you have been following our blog for a while, you would have noticed that I'm a huge sucker for duochromes or multichromes. And one of my all-time favorite brands has to be Ozotic. Their color-shifts are simply mind-blowing (see Ozotic 505 for case in point). 

While their 500 series have received much love and praises, their 700 series are sadly neglected despite being pretty amazing in their own right! Just look! 


Ozotic 730. 2 coats on its own.
Gorgeous duochrome that shifts from red to gold (see color shift from index to pinkie). The red is much richer and slightly brighter in real life. The perfect fall shades. :L

730 is significantly less sheer than its 500 series counterparts and can be worn on its own without compromising the color-shift. Unlike 505, the formula is not as runny - it's slightly thicker and flows smoothly on the nails. I had a little problem with my brush though. It felt a little strange and did not fan out very much. Thankfully, that didn't really affect the painting and I was able to get away with minimal clean up.

Because I've heard that the Ozotic 700 series look different when layered over white and black (how cool is that?!), I simply had to try it out for myself.

So here's 2 coats of 730 layered over white:


Here, 730 took on a slightly softer and more pastel look with the red turning a shade of coral-pink and the gold looking more yellow.

And this is 2 coats of 730 layered over black:
(two pictures to show the gold and the red)


Here, 730 takes on a dirtier, grunge-look. The red looks almost fuchsia and the gold turns slightly olive. 

Ozotic, I'm impressed. :b
More, pretty please? *flutters lashes*

Meanwhile, you can get your Ozotic fix from piCture pOlish or Star Trinkets (she also carries other brands like Manglaze and piCture pOlish!).

xoxo,
mich

**Product is provided for our honest review. Please see our disclosure policy for more details.**

Sunday, August 5, 2012

piCture pOlish: Amethyst

In the past few days, you may have noticed a massive swatch spam of piCture pOlish's newest shades on several blogs. Although I did not take part in the Blog Fest this year, Susan of Star Trinkets, piCture pOlish's network member from Singapore, kindly sent a bottle of Amethyst to us for review.


Amethyst was created with Susan of Star Trinkets, is exclusive to Star Trinkets & piCture pOlish and forms part of our Collaboration collection. When we asked Susan about her shade she said 'how about purple denim' so that is what has been fashioned! A stunningly beautiful blend of textures and glitters so really what more could a girl ask for? Well according to past history people believed amethyst crystals guarded against getting drunk so perhaps keeping a bottle in your handbag is a good thing!
-piCture pOlish

How cool is that? Susan's very own collaboration shade! I may or may not be just a tad jealous! lol! ;)

So here's my very first piCture pOlish!


Amethyst. 3 coats.
The twin to a popular piCture pOlish shade, Denim, Amethyst is a beautiful purple with a slight dusty-grey tinge, giving it a slightly smoky look. It is filled with electric blue shimmer and a sprinkle of purple/fuchsia shimmer. The blue flashes are so strong that Amethyst looks almost duochrome on the nails - really cool. To top it off, there is a scattering of silvery-white flakes to give it an interesting textured look. <3


Application was really good.
The formula was thin but not too watery. It is opaque in two coats but I added a third for a richer color. I had an urge to try layering it over a dark purple but my a-england orders are not here yet so I guess I will have to leave that for another day.
The brush was really easy to work with too. I hardly needed clean up! *impressed*

Overall, I'm rather pleased with piCture pOlish.
Apart from the polish, I also love the witty tag-lines they have added on the bottles. Too cute! Really fitting for their quirky and vibrant image. :d

So, what do you think of Amethyst?

The new network member collaboration shades are exclusive to piCture pOlish and the respective network member. So if you are interested in getting Amethyst, you can check out Susan's shop, Star Trinkets, or piCture pOlish. Susan ships internationally and also carry other polishes from Ozotic and Manglaze. She even has her own line of polishes - Star Trinkets!

xoxo,
mich

*Product was sent for honest review. Please see our disclosure policy for more details.*

Celebrating the Thousands - the winners!

Finally... the post that you've all been waiting for... the winners of our giveaway and nail art contest!!

The winners of the giveaway are:

a Rafflecopter giveaway
Congratulations, Donna and Kelly!!
I will be emailing you shortly so please check your inboxes (and spam folders too, just in case)!

And the overall winner of the nail art contest is...


Congratulations, Casey (dulllikeglitter)!! These nails are fabulous!

So that's the end of our celebrations!
A huge thank you to everyone who took part - whether in the giveaway or the nail art contest! It has been really fun for us and we hoped that you've enjoyed them as much as we did! We also hope that you will continue to show us your support and join us in our nail adventures here at The Polish Well :)

xoxo,
mich

Wednesday, August 1, 2012

Nail Ideas: Color Blocking!

Good morning!

If I'm not wrong, the giveaway and nail art contest should be over by now. Thank you everyone for participating! Hope that it has been fun for you :) I will be working on verifying the giveaway entries and selecting the ten finalists for the nail art contest in the next few days so stay tuned!

Anyway, I thought I would do a brief post on a mani that I did one or two days ago!


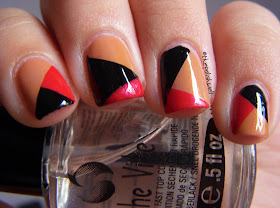
Tadaa! This is my first attempt at color blocking using tape and I must say it was less tedious than I had thought! By the time I finish adding one color over the base color for all my nails, I could start adding the next color for the first nail. Of course, Seche Vite did wonders in shortening the waiting time so I didn't have to wait too long before I apply the tape. The lines are far from being perfect though and I definitely need more practice.

I decided to go with red and black on a nude base for a more classy look. Not really appropriate to wear for the course I'm studying... buuuuuutt, the instructor is not going to notice my nails right? Right. ;)

So what do you think of color-blocked nails? Have you tried it before?

xoxo,
mich