Saturday, April 28, 2012

Essence: Date with the Night

Here's another short scheduled post! I am probably still in the middle of my exams. It turns out that I'm one of the unlucky ones to end my exams this late. Some of my friends have already finished their exams even before I started my first paper! It's seriously demoralizing to see facebook updates of their post-exam outings *tears hair out* I must persevere!!!

This is one of the first Essence polishes that I've got since they started selling at Watsons.


Date with the Night is a brown metallic polish. Really brush-stroke-y. It took me 2 careful coats with a light touch to kind of even it out. I'm not sure why I grabbed this from the shelves. I am not a fan of metallic or frost finishes at all. I guess I was drawn to the dark brown in the bottle. Unfortunately, it didn't really translate on the nails. It's more gray on me for some reason :|

I think I will try using it for stamping next time... They are supposed to be good for stamping right?

xoxo,
mich

Sunday, April 22, 2012

Essence: Love, Peace and Purple

I know I said I won't be here for a while but I really needed a break from all the studying. Any more and I swear I will be sick. :~

So here's a quick swatch of Love, Peace and Purple from Essence's You Rock Trend Edition in... May 2011. :o And we only just got it here in Singapore. Ah wells. Better late than never right? Maybe, just maybe, they will bring in the Vampire's Love LE and the Circus duos! *hopeful*

Ok, I digress... Swatches!


Love, Peace and Purple is touted as one of the dupes for the famous Chanel Paradoxal. It is a very smoky, greyed-out purple - really chic, sophisticated looking and very... Chanel! To make the shade more interesting, it is loaded with purple shimmer that pops out where the light hits the nails, subtly lighting up the area. Super gorgeous!


I wish I have a clearer macro shot for you but I was in a hurry so most of my pictures were a tad too blurry to show the pretty purple shimmers.

Application was quite good. The formula was smooth and a little thin. The first coat was slightly sheer but the color builds up nicely by the second coat. The brush was small but that's only to be expected for such a small bottle. The bottle is incredibly cute - like a mini Chanel or NARS. <3

So what do you think of Love, Peace and Purple?

I'm really glad I grabbed this from the shelves. It was the only one left!
Just in case you are wondering, Essence can now be found in Singapore in selected Watsons stores. For a list of their counters, you can check out their facebook page here. Currently, they can be found at Ngee Ann City, Lucky Plaza, Sun Plaza, Parkway Parade, Lot 1 and Anchor Point.

If I'm not wrong, Essence will also be releasing a new Snow White Trend Edition in June. More details can be found at Nailderella here. And guess what? They will be available here in Singapore too!! Whee~ :e
No prizes for guessing which ones I'm eyeing... the g.l.i.t.t.e.r.s!! :mj

Which ones are you eyeing?

xoxo,
mich

Wednesday, April 18, 2012

Nail Ideas: Stamping Fun!

Good morning!

Today, I will be sharing one of my 'firsts' - stamping! ;)
I've seen really cool nail art done with stamping so I thought to join in the fun too! Jayo kindly lent me her stamp set and these are the stamp plates that she's got:


Seems like jayo likes french tips quite a bit! Strangely, I haven't really seen her wear them before =\
Hey jayo~ Are you letting your stamp plates rust? ;)

Anyway, here are some of the designs that I came up with using the plates. If you've been following me on instagram (@thepolishwell), you would have seen some of these stamping mani-s that I've tried.


It's official. I have a weakness for animal prints. There's just something really classy about them! And what's classier than an animal print mani? Funky animal prints french tips!

Products used:
Orly White Champagne - for the white tips
OPI Barre My Soul - please excuse the horrid stains on my nails. I should have slapped on two coats to cover the stains
Clatty - black (any one coater black should do the job)
N.NAIL Stamp Plate B57 (top left in the first picture)


Now, here's another mani that I really liked. Simple but absolutely gorgeous! Initially, I wasn't quite sure where to place the stamp but I decided to try lining up the stamp against the edges of my nails so they won't look so out of place. Love how it turned out. :D

Products used:
China Glaze For Audrey - base color
a-england St. George - stamping color
N.NAIL Stamp Plate B97 (bottom right in the first picture)


Finally, I decided to try another french mani because the bow looked too cute on the stamp plate! I didn't quite like this one on my nails though. The bow looked a little too big for some of my nails. Maybe I should have just stamped on an accent nail =\

Products used:
Orly Au Champagne - white tips
OPI Barre My Soul - base color
O2 Skin MK 0220 - red
Konad Stamp Plate - M56 (top right in the first picture above)

And because my sister saw me stamping merrily away, she asked for a manicure too. I think she was secretly impressed with my stamped nails. She didn't admit it, of course ;)

Behold! My unwilling model! I had to beg her to let me take this photo... :||
It took me quite a while to decide on a design and color scheme for my sister's nails. But these turned out quite well, right?  The design is simple but looks absolutely funky and striking against the white. I loved it so much that I did it for myself too! Both my sister and I received quite a few compliments in school! :L

Products used:
Orly Au Champagne - base color
Clatty black - stamping color
N.NAIL Stamp Plate B97 (see picture above)

So that's the end of my first stamping adventure! They turned out fairly good for a first-timer right? :$

Some tips that may be useful for a beginner stamper:
  • It helps to paint a (fast-drying) top coat over the base color before stamping.
    • If the stamping goes wrong, just lightly wipe it off the nail immediately with some nail polish remover and you can stamp away without repainting the whole nail again.
    • As a follow on from the previous tip, you need not be worried that the french tips designs on the plates are too big for you - just clean up with a little remover to keep the design on the tips only.
  • Experiment with different polishes for stamping - but any pigmented one-coater should get the job done.
    • Try to avoid quick-dry polishes if you are new to stamping and can't work that quickly.
  • Work fast to scrape excess polish and pick up the design with the stamper before the polish dries.
    • It helps to leave the polish bottle uncapped when you're doing your stamping.
  • If you are not picking up the design,
    • Clean the plates with some remover to get rid of the dried polishes in the grooves,
    • OR check if there is a thin plastic film covering the plate - peel that off first! Don't worry, you're not the only one who didn't know that (speaking from personal experience o"o).
  • You can take some time to position the image over your nail before stamping. The image will still transfer onto your nail even though the polish has sort of dried. (I am not too sure how long you can wait but I sure took a few seconds to position the stamper before I stamped)
    • I rest the edge of the design against the side of the nail before stamping the whole nail in a rolling motion - this helps to get the stamping straight.
So what do you think of nail stamping? I'm really considering getting myself a stamp set - after all, it's a quick and easy way to refresh a mani with some nail art!

Just in case you are wondering where these plates are from...
The konad plate was a gift to jayo so I'm not quite sure where you can find them.
The N.NAIL plates can be found here at KKCenterHK. They also stock a great variety of other makeup products.
You can check out jayo's review over here.

If you decide to shop there, be sure to check out using our promo code "ThePolishWell" for a 10% discount - valid till 31 Jan 2013! :party

Happy shopping and stamping!!

xoxo,
mich

p.s. I just realized with a shock that I only have a week to revise for three exam papers! o_O Just kill me already. Anyway, I apologize in advance if I cannot find the time to do our regular posts or commenting on blogs! I hope you will understand and I will miss you! :c Wish me luck! 

*N.NAIL Stamp plates B57 and B97 were provided for honest review. For more information, please see our disclosure policy.*

Sunday, April 15, 2012

Stamp Plates!

Hi all!!

This is going to be my first 'proper' post (discounting the blog awards, giveaway and such) for a long time!! *waves to new followers* =D

Today I'm going to try out and compare all the nail plates I have!! Three!!


The first two are N.NAIL stamp plates from KKCenterHK, B57 and B97!


The first thing that caught my eye when I looked at B57 (leftmost in picture above) was the stripes and stars groove pattern. What else can one be reminded of but the American flag? =D So I wanted to create this look:
Picture adapted from here

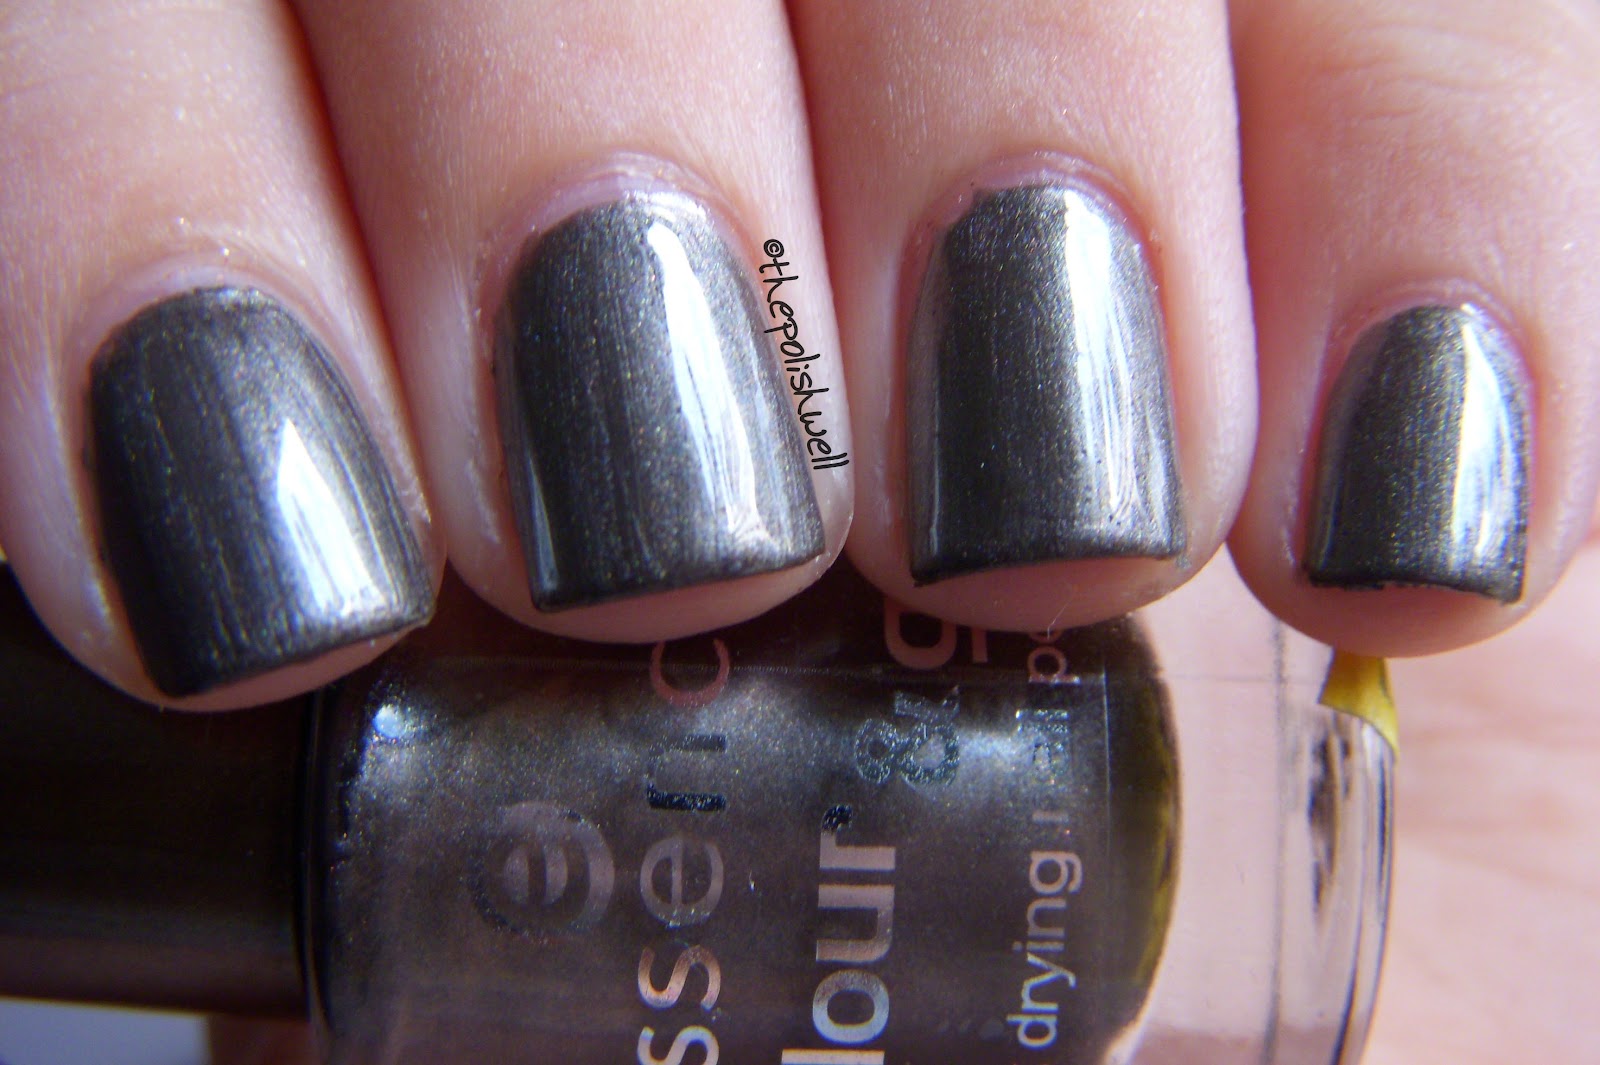
And so after multiple tries on the plate, I finally got this!!


I applied only one layer of base coat. After it dried, I stamped the pattern on the tip. I used Mayer AM11 for red, China Glaze Up All Night for blue. Only one drop of each colour is needed to fill up the groove on the plate (you can jab around to fill up all space there is in the groove, but do this fast!). Then I went over it with Tony Moly Hologram and a top coat. Tadaa! 
Felt all ready to watch The Avengers this May!!

Whee! Poster! Nice fan art right?! Source


A friendly note: the polish you use might stay in the groove and make it shallower and shallower such that your stamp will pick up less and less polish each time you stamp! Be sure to clean up when it gets intolerably shallow (according to whatever your tolerance level may be). For the little grooves and the edges of the grooves, you can use a brush (from your unwanted old make up brushes or your normal manicure clean-up brushes) to poke around so that the grooves will be squeaky clean and ready to fill with polish again!

Okay, so on to the next plate!


This is the one that caught my eye!


So badass right?! This pattern can be used as a french tip (if your nails are wide enough) or it can be done vertically as thus (provided also that your nail is long enough). I was very impressed with the nail plate because the pattern in the tiny grooves were easily imprinted on my nail! No struggles at all :D

Here I used 2 layers of Blaze Lemon Zest on base coat, Dearface Black for the pattern, and here it is seen with top coat!


Love the colour-changing Blaze so much! Here it is in the sun ^_^

Last but not least, KONAD nail plate (topmost in picture above). The set was given to me by my friend for my birthday. It comes with a plate, a scraper, a stamp, and a special KONAD nail polish. I think it's considered special because it is more viscous but doesn't dry too fast in the groove so that it's hard to pick up. Any similar nail polish can do the job reasonably well too.


Here's a picture of 1 layer of Sinful Colors What's your name on top of base coat. Look at the purplish and teal flecks! Love this polish. Super pigmented and all. No bald spots ^_^ Okay let's not get distracted..


For the pattern I used the KONAD special nail polish (silver, shimmery) and mixed a little China Glaze Up All Night. Again, I emphasise that you need to be quick! Then I stamped the pattern on twice, and thankfully the outcome looked quite matching and it is not immediately obvious that it was stamped twice instead of just once =P The picture above is seen without top coat, while top coat is applied for the pictures below.


Silver with a blue-ish hue, seen with purple flecks!! <3


Drooling goodness =D

Here, it is taken from another angle and you can see that you cannot really tell where the first stamp pattern starts or ends, or where the second one does! The advantage of having complicated patterns hehe.


 Here's a final one in the sun!


The whole process was actually not that stressful and frantic, perhaps because it's not the first time I've tried stamping. But it is the first time I am using more than one colour for two out of three of the patterns, so a little more speed is needed.

Both the konad and N.NAIL stamp plates stamp really well and I was able to pick up the entire design cleanly, including the little edges of the second pattern, and the stars of the American flag pattern! But of course, to keep your plates in tip-top condition and your imprinted patterns clean and sharp-edged, use your nail polish remover and brushes!

The N.NAIL plates can be found here at KKCenterHK. They also stock a great variety of other makeup products. If you decide to shop there, be sure to check out using our unique promo code "ThePolishWell" for a 10% discount - valid till 31 Jan 2013! Yippee!

AND, *pssstt* here's sharing a secret: Mich is gonna do a post on stamping soon, and it's gonna have many useful tips for stamping! Stay tuned, and I'll leave you in her very good hands (omg pun!)!

Happy shopping and stamping! ;)

xoxo,
jayo

*N.NAIL Stamp plates B57 and B97 were provided for review. For more information, please see our disclosure policy.*

Saturday, April 14, 2012

OPI: Barre My Soul with Pirouette My Whistle

If you've been following us for a while now, you would know I am not a fan of nudes. I'm all for the dark side (they have cookies!). But when I saw these swatches at Scrangie's, I knew I was a goner. I had seen quite a few swatches of the NYC Ballet collection before that but nothing quite prepared me for the yumminess on Scrangie's nails. So be warned: click that link at your own risk!

So what happened next was an insane and very tortured decision-making process which involved devil whispering, "They are really pretty!!"; and angel saying, "You know you won't wear them!"
No prizes for guessing who won in the end - devil said, "They will be work appropriate!" I ended up grabbing two from the collection: Barre My Soul and Pirouette My Whistle. I'm really glad I did. I already used it twice before this post.


Barre My Soul is a sheer peachy-beige jelly that looks oooooohhh so squishable! I used three thin coats for these swatches. There is still a hint of VNL but I'm perfectly fine with that - it gives my nails a very subtle french tip. Really pretty and flattering!

Application was really much easier than I had expected. I've heard that sheer jellies are usually extremely streaky. So I went about painting my nails carefully with a slightly lighter touch. Fortunately, I had no streakiness so I guess the OPI formula is much better. I didn't have that much luck with Essie Marshmallow but that's a story for another day.

And because the glitter topper is just calling out to me, I added one coat to each of my nails.


Look how delicate and pretty it is! I really like the glitter mix - plenty of small silver glitter with some white hex glitter floating lazily around. So dreamy! *sighs happily*

And since I'm still obsessed with mattifying everything:


Ahhhh I love this look! Now, I really feel like I have fluffy white clouds or cotton candy *yum* on my nails! ;p

And if you had been following me on Instagram (@thepolishwell) / Facebook, you would have seen this NOTD I did with 2 coats of Barre My Soul over tips freehanded with Orly White Champagne:


2 coats of Barre My Soul hid my stains really well and I was so in love with this classy look!

Erm, yea... so I ended up liking this sheer jelly a lot. I might just end up buying the other jellies in this collection. I know a lot of people were drawn to the sheer pink (You Callin' Me a Lyre) but it looked a tad too pink and stark for my liking. *shrugs* Who knows, I may change my mind after falling in love with Barre My Soul!

What do you think of Barre My Soul and Pirouette My Whistle? Do you like it matte or shiny?
Which other colors did you get from OPI NYC Ballet?

xoxo,
mich

Wednesday, April 11, 2012

Girly Bits: Shift Happens

Hello everyone!

Today we have another post by Cheryl!
If you are a huge fan of indie polishes, you will definitely enjoy this post! I know because the polish sure had me drooling all over my laptop! ;p

Without further ado...

---------------------------------

I have wanted to try out some of the gorgeous self-made polishes by all the talented nail bloggers whose swatches have been popping up on my blog newsfeed for a while now. So, when meimeisignatures brought the indie brand Girly Bits in, I knew that I had to try it! Pam is the lovely lady behind Pam’s Girly Bits, and I must say that her collections so far have been really unique! I had a hard time choosing which polish to purchase because they all looked so pretty, but I finally settled on Shift Happens after much consideration.

Shift Happens is a beautiful layering polish that undergoes various color shifts from dark red to gold to green. For these photos, I layered one thin coat of Shift Happens over two coats of A England’s Camelot. But, I would imagine that this would look great over other dark polishes as well. Indoors, my nails were of a muted dark shimmery red. But, when the light hits it just right, they turn into breathtaking shades of orange, gold and green. It’s really pure awesomeness. If you have been lusting after Clarins 230 or the recent Max Factor’s Fantasy Fire (which is practically impossible to find where I am staying!), I would say that Shift Happens would be a perfect alternative to them. The color shifts in this polish makes it really intriguing to look at when it’s applied on your nails!


mich: *jaw drops*
What do you think? Are you eyeing any of the Girly Bits polishes already? ;P

Cheryl
-----------------

Thank you Cheryl!

Now, wasn't that an epic post?! If you've enjoyed Cheryl's nail posts, you can hop over to Instagram (now available on Android too) and follow her @cherily for more NOTDs!

xoxo,
mich

Sunday, April 8, 2012

Nail Ideas: Easter!

Happy Easter Sunday everyone!

It's been a really long while since I've last attempted any nail art. So I've decided to pick up my tools and try some Easter design - complete with Easter eggs and bunny!

Much as I wanted to come up with something pretty, I was quite uninspired despite surfing pinterest, weheartit and my trusty google! In the end, I decided to do a skittle mani with soft Easter shades.


Since Easter is all about pastels, I dug around for them in my stash. It turned out that I only have two cremes that could remotely pass as being pastel-ish - China Glaze's Seaspray and For Audrey. *facepalm*
So I rolled up my sleeves and frankened a small amount of baby pink for my index finger. It turned out being a little dusty looking and leaning lavender - awesome!
Just as I was about to add some blue into the mixture to get some pastel purple, I spied my Spring Kisses at the corner of the drawer and decided to use it. To tone down the shimmer and make it more pastel-like, I topped it off with a coat of beige jelly, OPI Barre My Soul. The milky jelly worked quite well as a pastel-fier I must say ;p
That was quite some work just to get the base colors, right? Just imagine the time I would have saved if I just had some pastel shades in my stash! lol!

Anyway, I ended up doing polka dots for all the nails (except the ring finger) because I wanted to keep the mani simple and wearable. I figured it's ok since people paint polka dots on Easter eggs too, right? Ok ok, I admit, I was actually just being lazy. ;)
The bunny was painted using the polish brush and a toothpick (as usual).

And just because I think the polka dots and bunny will look softer matted:
(yes I've got my matte top coat! Whee~)


Ahh I love that my nails have gone all fuzzy looking! :D

So what do you think of my Easter nails?
What are you wearing for Easter this year? Feel free to share your mani on our facebook page! After all, it's no fun just seeing my nails all the time ;)

xoxo,
mich

Edit: I was told by a friend that a similar design was seen on instagram. I've not actually seen it myself before I did this mani (and still have not) so please do not be offended if I had actually replicated your design without knowing! It is always my policy to acknowledge the sources that I've referred to.

Saturday, April 7, 2012

Cult Nails: Living Water (and a comparison with CG Smoke and Ashes)

Seeing as the Cult Nails $5 sale is starting in a few hours, I thought it would be a good time to show you one of my favorites: Living Water! It was the polish that led me to join the Cult after all! ;)


Living Water is described as a "deep blue jelly polish with ice blue and emerald green glitter inspired by the phosphorescent sea-water". I really couldn't have said it better myself!

It was definitely a love at first sight for me. Who doesn't love some sexy sparkly glitter twinkling in a dark base? Then, I knew I had to get this after I read the description - my geeky self was hooked when I saw the words "phosphorescent sea-water". How cool is that? ;p


Twinkling... twinkling... *_*

Isn't it just mesmerizing?! *_*

The formula is really good too. It was smooth and easy to apply, taking only two coats to be completely opaque. (Please don't mind the bald spot on my ring finger - didn't realize I mucked it up until I was editing the photos.) It dries really glossy with a nice jelly finish but I added top coat to help the micro-glitter shine - only one coat of Seche Vite was needed.

As promised, here's a quick comparison with China Glaze's Smoke and Ashes which I've previously swatched here. Both are shown with one coat of Poshe base, two coats of color and one coat of Seche Vite. As always, click to enlarge!


From afar (stretch-your-hands-as-far-from-you kind of afar), they are really similar, if not alike. But they are definitely not dupes. Living Water is an obvious darkened blue / teal jelly (look at that shine!) while Smoke and Ashes looks like a nearly black creme. LW also has glitters instead of flecks. The glitters in LW show up slightly more on the nails too - they glow.

Here's one last picture that show the glitters and flecks more clearly:


So do you need both? Not really... Unless you have a weakness for this kind of colors, like me.
If you ask me, I actually prefer Living Water because of the formula and the glowy glitter. But if you don't like glitter removal (I highly recommend the foil method), Smoke and Ashes would be a better choice for you. It's really pretty too!

Cult Nails can be purchased on their website - they ship internationally!
For people staying in or near Singapore, you can also purchase Cult Nails from the sweet Mei Mei at Mei Mei's Signatures for SGD12.50 each. Delivery is extremely fast too! :)

FYI: The $5 Sale starts at midnight EST on April 7 until 11:59pm EST on April 7!
You can now buy up to 3 colors at USD 5 each!
For more details, please check out this post. I am not entirely sure if Living Water will be available as there are less than 200 bottles available in stock as of April 3.

So what do you think of Living Water?
Which other Cult Nails do you like?

xoxo,
mich

Thursday, April 5, 2012

Zoya: Skylar

Good morning lovelies!

I don't know about you but after so many days of dark polishes, I'm in the mood for some lighter shades. Since there was a request to swatch Skylar from Zoya's True Collection, here goes:


Skylar is a slightly dusty blue filled with silver and muted gold flecks / shimmer. Really soft-looking and pretty! Makes me feel all delicate ;)

I am really surprised by how much I like it on me! Like... I really really love it!!!


Isn't it sooo pretty?
The formula was good - smooth and not runny at all. It was nicely opaque in two thin coats and dried glossy. I added a top coat anyway to really bring out the tiny flecks - I find that the top coat always brings out the tiny details in a color. The brush is the usual one but fans out nicely and is easy to control - barely any clean up was needed. That's always a plus in my books. Now Zoya has really gotten my attention ;p

So what do you think of Skylar? Did you get any other colors from the collection?

xoxo,
mich