Tuesday, February 28, 2012

Nail Ideas: black and white molecules!

Sarah is absolutely right.
Dotting is really suitable for anyone - regardless of skill level. Even the simplest and most easily replicated design can be extremely fun and eye-catching. Most of all, there is plenty of room for creativity! Don't believe me? Just take a look at all the entries for the competition! I am sooo going to try some of the designs myself soon!

Anyway, this is my next dotting design:


This design was based on this picture that I found while googling... you've guessed it: "dots"! How creative can I possibly get?! ;p


I didn't follow the google picture to the T but I was going for the color scheme and overlapping dots design. The dots look so cute and cozy together! Our dear Jayo said they look like molecules!

cute molecules!

I think it comes as no surprise that we took chemistry in our pre-u. Lol!

Polishes used:
Nails Inc - Black Taxi (black)
Clatty - #92 (white)
As usual, the grey was mixed using the black and white. Wellll... I guess my stash is really small *shrugs*

And just because I think this looks cute:


So... which do you prefer: this or the bokeh dots?

xoxo,
mich

Edit (15 March 2012):
Rebecca is also hosting another super awesome nail art contest here.
I had really wanted to come up with another mani but I am still caught up with my assignments so I am submitting this design for now. Hopefully I will have the time to do something soon :(

Sunday, February 26, 2012

Nail Ideas: purple and pink bokeh dots!

Good morning everyone!

I am sure many of you have already heard of the nail art dotting competition that Sarah is hosting at Chalkboard Nails. Not only are the prizes great, it is a great time for us (especially me) to brush up our dotting skills.

In any case, seeing as we've posted way too many swatches for the past few days, I thought it would be fun to have a few dotty dotting mani-s here! :D
As usual, all designs are done with a bobby pin and/or a toothpick.

So.. on to the first design!


This is my very sad attempt at a bokeh look on my nails. It took me quite a few tries before my nails look remotely decent. The first few attempts were horrid and the random dots look just like splotches on my nails. Quoting our dear Jayo, they look liked someone just puked on them. -_-||

Since it is not very obvious on my nails, this is what bokeh is about: where the lights / colors are deliberately blurred to create a very soft and dreamy effect


Well... I suppose if I blur the picture a little, it may just look bokeh-ish?


So, does it look more bokeh?
Come on, humour me please? LOL!

Polishes used:
Nails Inc - Black Taxi (black)
My franken - Purple Rose of Virgo (just a stroke across the nail for the sprinkle of glitter)
My franken - Spring Kisses (glittery / shimmery sheer dots)
Sally Hansen - Flashy Fuchsia (pink)
Clatty - #92 (white)
Since I don't have so much pink shades, most of the shades you see are mixed from the pink and the white on a piece of cardboard. I also used some clear polish during mixing to make the dots more translucent for a more bokeh-ish effect.

And just because I quite like the pink and purple dots, bokeh or not, here's another shot:


So... what do you think of this design? Love or nay?

xoxo,
mich

p.s. do check out my other dotting design! <3

Saturday, February 25, 2012

Tony Moly: GT05 Jupiter (Galaxy)

Good morning everyone! It's the weekends!
I never thought I will come to say this but... no TGIF for me :( My school starts again at full throttle next week and you can be sure I didn't do anything productive during my break *yikes*

Anyway, before I get totally engulfed and buried in school work, here's the last glitter from Tony Moly's Galaxy collection - Jupiter!


Jupiter is a dark purple polish (slightly darker IRL) with a complex mix of glitter - largely light purple glitter with some larger blue/turquoise hex glitter - very much like those in China Glaze's Lorelei's Tiara. Although the blue glitter flashes turquoise-green at some angles in the bottle, I was just a little disappointed that I couldn't spot the flashes on the nails. What's more, there is a sprinkle of small copper-red glitter. Super pretty!


Ahhh... I love how the copper glitter glows against the dark background - just like those in Mars!

Well, what do you think? Which is your favorite from this collection?
Mine is still a tie between Mars and Neptune!

If you love any colors from this collection, don't forget to enter our 100 Followers Giveaway!
Winners can choose any colors they want from the Tony Moly Galaxy, OPI Holland and/or China Glaze Hunger Games collections!

xoxo,
mich

Wednesday, February 22, 2012

Tony Moly: GT04 Neptune (Galaxy)

Good morning!!
I woke up today to find more than 200 followers on tpw! *mindblown* We hadn't expect such a warm response to our giveaway! :D
Here's a huge welcome to all of you here!! We sincerely hope that you will enjoy our blog! <3

Anyway, as promised, here's another fantastic Tony Moly polish from their Galaxy line - Neptune!


Neptune is a dark green polish with a mix of large green glitter and smaller silver and gold glitter that gave it lots of depth. Green and gold?! 'Nuff said.


*_*
Did I say I've given my heart to Mars? Can I take half of it back and give it to Neptune too? I really can't decide which one I love more! Which of the TM glitters do you prefer?

If you love the Tony Moly Galaxy Collection, don't forget to enter our 100 Followers Giveaway to win any polish you want from this collection as well as the OPI Holland and China Glaze Hunger Games collections!

Meanwhile, stay tuned for the last TM Galaxy glitter!

xoxo,
mich

Tuesday, February 21, 2012

100 Followers Giveaway!! *CLOSED*

*squeals* We've reached 100 followers!!

THANK YOU ALL soooo much!
Over the past six months, we have really enjoyed ourselves, bringing lovely nail polish after lovely nail polish to you, and we are truly glad that all of you have shared our happiness. Like they said, happiness multiplies; the more the merrier! We cannot thank you enough for sharing about us, supporting us on facebook, tumblr, twitter, blogger, pinterest, weheartit, bloglovin, and for giving us encouraging comments! Just imagine our joy when we saw the many notes on tumblr and the hundreds of hearts (on weheartit)! The positive feedback on our posts just makes us want to keep going and hope to bring more nail polish love to everyone. :D

Ok, noooooooowwwwwwwwww, for the moment we've all been waiting for: THE PRIZES!

We've been thinking long and hard about them. That's quite understandable considering that there are a lot of exciting collections released or to be released this year!
So, instead of having to make the difficult decisions ourselves, we've decided to let the winners choose the colors that they want from, not one, but three awesome collections: China Glaze Hunger Games, OPI Holland and/or Tony Moly Galaxy Collections!
ok that is a sad attempt at a giveaway picture :(
Yup, you've got that right! The winners can pick and choose any colors they want from these three collections!
You can view swatches here: CG Hunger Games, OPI Holland, Tony Moly Galaxy

This giveaway will be open internationally.
And because we want to share a little polish love with more people, we've decided to choose, not one, but three lucky winners! Not to worry, all winners will get to choose the polish(es) they want but the first will get 3 polishes; the second winner, 2 polishes and the third winner, 1 polish of his/her choice!
All polishes will be brand new and will be purchased after the winners indicate their preference.

So what are you waiting for? :D
The giveaway will end on 22 Mar 2012 at midnight EST.

Sunday, February 19, 2012

Tony Moly: GT03 Mars (Galaxy)

Good morning!! I hope you are having an enjoyable weekend so far! :)

Today, I have for you the third polish from Tony Moly's Galaxy Collection: Mars!


Mars is a dark brown polish packed with a mix of large gold and smaller copper glitter with a scattering of blue glitter.

This one is definitely an unexpected favorite of mine. I had thought the gold glitter would be too overwhelming (in a negative way) but it completely blew my mind out (in a good way) when I painted my nails! The copper glitter added just enough depth to the gold while the blue prevented the color from being too boring.

Oh and have I already mentioned that the glitter glows? Freaking awesome.


Look at it glow!
*swoon*
So what do you think of Mars?
Has it stolen your heart yet? It sure has mine.

xoxo,
mich

Saturday, February 18, 2012

Tony Moly: GT02 Earth (Galaxy)

Hello everyone! *waves enthusiatically*

Why am I so happy, you ask? Well, we're at 96 GFC followers!! Only 4 more to the magical 100! *yay* Thank you so much for liking us and joining us here in our little polish well :)
Definitely time to plan a little thank you gift *wink*

Today, I'm back with the second of the Tony Moly Galaxy glitters - Earth!


Earth is another fantastic polish jam-packed with a mix of blue, purple and pink glitter in a sheer dark purple base (the second picture is more color accurate). And am I imagining those random rainbow flashes from the polish? Ok, I did not. There are some holographic glitters buried in the mix too! Awesome!

Again, I can hardly imagine Mother Earth looking this sexy vampy! Lol!


Here's another drool-inducing macro shot of the nail:


Eh... wait a minute! It does look similar to my franken, Purple Rose of Virgo! D: 
But they are definitely not dupes. The glitters in Earth are generally chunkier and much more dense. Cue: foil removal method
What can I say? I love them both! :D

What do you think of Earth?

xoxo,
mich

Wednesday, February 15, 2012

Tony Moly: GT01 Mercury (Galaxy)

Hello polished pretties!

As some of you might have already known, I've recently ordered the entire Tony Moly Galaxy Collection and was blown out of my mind by the glitters. Some of you might have already seen swatches of this collection in other blogs quite a while back but they definitely deserve yet another round under the spotlight. They are that awesome!

First up, we've Mercury!


Mercury is packed with small square red, blue, gold and silver glitters suspended in a sheer black base. Because of the even mix of glitter, it still manages to look complex and interesting from afar. While the colors are not quite what I imagined the planet to look like, it's pretty nonetheless!

The formula is pretty good and smooth for a glitter polish - not clumpy or gloopy at all. Although the brush is a little short, it was easy to handle and fans out nicely to allow smooth application. The glitter is very dense and you can easily reach full opacity with one or two coats. I did two for the swatches just to be sure.

What really surprised me was the dry time! It dried in seconds! To be more accurate, the first finger was already dry by the time I finished painting the fourth finger. *_* Are they insta-dri too?

As with most glitters, it definitely needs top-coating to bring the glitters to life and to get that smooth and shiny look.


Look how sparkly it is under the sun!


Here's the mandatory close up of the nail for your drooling viewing pleasure...


So what do you think of Mercury? Do you have this collection already?

Do look out for more Tony Moly coming your way! :D

xoxo,
mich

Monday, February 13, 2012

Moree nail polishes!

Yay!! We've finally reached 88 followers on blogger!! *wooo hoooo*
Such a lucky number too! (The Chinese believe 8 is a lucky number because it sounds like the Chinese word for prosper.)
Only 12 more to go before we hit 100! Hmm.. Time to plan something! :D

Last saturday, Jayo and I went for a lovely brunch (or rather lunch) with two wonderful ladies - Susan from The Subtle Shimmer and Ink from Inkypolisholicious! After months of chatting on twitter, it feels great to finally meet them in person and chat about... nail polish!! Well, it's not often that you find people speaking the same language! ;p

And to make the day even more perfect, I got my first lynnderellas from Ink!! I'm sorry for not taking photos of the cute package but it was sadly ripped apart in our haste to see those pretties!

Here they are:
*drools*
I can't wait to try them!!

After brunch/lunch, Jayo and I decided to scout around Orchard but didn't manage to find what we want. :(

Just before going home, I decided to pop by Smoochiezz to collect the polishes that I've reserved... a MONTH ago! >:(

From left: Skyscraper, Atlantis
You wouldn't believe how difficult it was for me to get these two colors but I shall spare you from my ranting.

That aside, I also received some nail mail about a week ago.


Yes! This is the Tony Moly Galaxy collection!! So pretty!!

I also got some other random glitters from TM:


Oh and some from Olive Deco:


Enough pretties to tide me through my no-buy, don't you think? More swatches soon! :)

xoxo,
mich

Sunday, February 12, 2012

Nail Ideas: Hearts!

Hello polished pretties!

Today, I have for you another Valentine's Day mani!


Yes, more hearts!! I'm pretty unimaginative I guess.

I had wanted to needle marbling for quite a while now after seeing it at Copy That, Copy Cat and My Simple Little Pleasures. So, I've decided to take this opportunity to try my hand at it and needle some hearts.

Although Colette makes it look like a piece of cake, my first few tries were quite disastrous. Initially, I chose OPI Who Needs A Prince as my base but it wasn't very successful because it dries pretty quickly. I couldn't for my life drag through it without leaving a tiny trough on the base color. In the end, I picked up my first franken - which I know, takes forever to dry. At last, victory is mine! As it does not dry so quickly, I have a fairly liquid base to marble with.

Because the red spreads out fairly nicely on my nails, I thought, hey! Why not do it the water marbling way and alternate drops of color on my nail? Thus, the design for my ring finger was born. To get this effect, I dropped a drop of red before adding another drop of the base color and dragging through the colors.


Although I was quite happy with the final results, I must admit that needle marbling requires a little bit of practice - see my index finger for a poor example.

For those who are looking to try out this design, I will recommend using a toothpick to drag through the design because I find the needle too delicate and fine for this design. Of course, I also recommend waiting a few minutes for the nails to dry a little before putting on a top coat or you might just end up ruining your design - see nail on pinky. *slaps self on forehead*

So, what do you think of this design?

Oh! And Happy Valentine's Day in advance!

xoxo,
mich

Wednesday, February 8, 2012

Nail Ideas: Heart Strings!

Good morning lovelies! I hope your week has been well so far!
Mine has been a little "eventful". First, my NailTek is getting way too gloopy to be used. Then, I realised that I ran out of cotton too. To top it off, my Seche Vite is starting to become thick and stringy... (my friend, Claire, kindly helped me grab Seche Restore over the weekend! Thank you, Claire!! <3)
All in all, my swatching plans have to be shelved temporarily and a shopping trip is in order. :(

In the meantime, I've decided to try my hand at some Valentine's Day mani!
I had thought to give V-day a miss because yours truly is still unattached. But after seeing some cute manis on my blogger feed, I've decided to indulge myself in nail art too! Who says I can only paint my nails for someone else, right? ;D

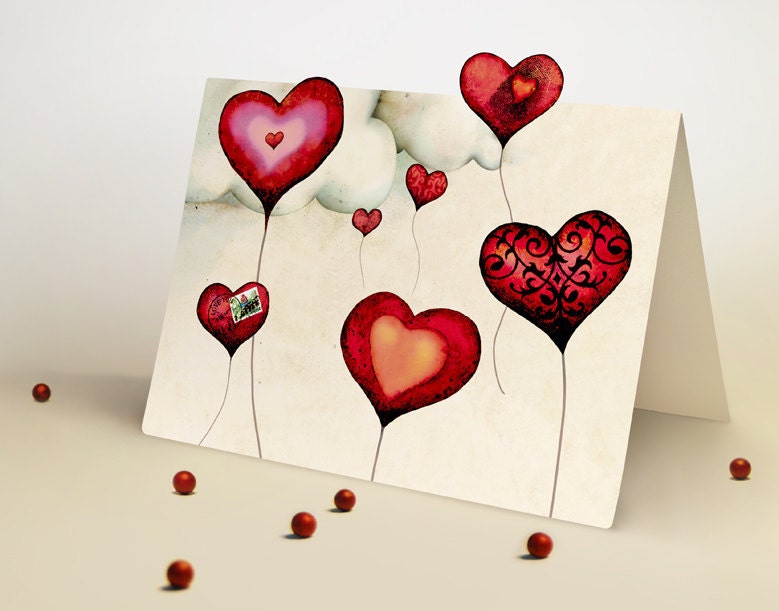
So, I was browsing pinterest for inspiration when I chanced upon this picture:

pinterest
Aren't those heart-shaped balloons soooo pretty and adorable? :D
And so I came up with this mani:

ahh! My thumb made a rare appearance!
If this looks familiar that's because I modelled this design after the paper plane / bee type of mani with the string running across my nails. For the heart, I followed Jane's cartoon heart tutorial on Nailside. Although my heart is nowhere as good as Jane's, I LOVE it! It turned out much better than I'd expected ;p

Because I really liked the name Lynnderella came up with for one of her polishes, I've decided to call this mani "Heart Strings" as well! Sorry Lynn! I hope you don't mind! ><

Polishes used: China Glaze Seaspray, China Glaze Fairy Dust, Sally Hansen Insta-dri Flashy Fuchsia, Clatty black and white.

Here's an Instagram with the balloon's string aligned:


And if you have been following me on twitter, you would have spotted me ranting about my lack of ambidexterity. Because I love this mani so much, I've bitten the bullet and attempted to replicate the design on my right:

Eek! I can't even pose properly with my right!
Oof! Another rare appearance! I don't think I've ever shown a picture of my right hand before. Sorry for the lack of clean up, I was trying to snap a picture before the sun get any brighter (and more yellow). Talking about that, I never knew it was so hard to take a picture with my left hand. I had two blurry shots before I managed to get a focused picture.

It may not be that obvious in the picture but the heart on my right hand is decidedly slanted with the pointy end, well, to the right. It looks less like a balloon, but it's still rather cute... right? LOL!

So, what do you think of this mani? :)
Hopefully I will have the time to try more v-day manis this week!

On a side note, I don't know if any of you've ever felt this way.
Everyday, as I read and comment on the nail blogs I'm following, I always wonder... why the heck am I so good at typing captcha "words"?! Ordinarily, I am a horrible touch-typer. My friends will know that my lecture notes are often ridden with typos. BUT I am surprisingly accurate when I type in the captcha words!
Blogger says, "Please prove you're not a robot."
Ok..
Then I must be a weirdo. Ah wells. ;p

xoxo,
mich

Saturday, February 4, 2012

FIMO accents on OPI You're A Doll

Hi y'all!!

After a few days with OPI You're A Doll, I decided to spice things up a little with some bling and FIMO! 

FIMO is just a kind of polymer clay used to make those hardened things we sometimes see on earrings, bracelets and other accessories that go for ridiculous prices (relative to the cost price) and some smart dude or dudette decided that we could use it for nail art too! 

Thankfully, they are much more affordable, largely due to the size. A stick that can be cut into more than 100 pieces is going for less than a dollar at some places! So here is what it looks like after I stuck two on: 


I stuck the FIMO on with generic nail glue. One word of caution: DO NOT get nail glue on your hands! I got some on my finger and thought it was alright, but was I wrong! It burnt a hole! The whole area was numb. So, do take care.

That aside, for layering, I used OPI Teenage Dream on the nail of the middle finger.I have reviewed this awesome glitter polish earlier, and have also recently used it for Chinese New Year.

I drew on the nail on the ring finger with a silver glitter nail art pen that I have reviewed earlier (PR French Nail Colour). Then I put on the top coat. Because Teenage Dream's solution has a tinge of pink, you can notice that there is a very slightly different base colour of the nail on middle finger.


Here is an awesome picture of the rainbows (you can see two here - top right and bottom right of nail) on Teenage Dream glitters!


Actually, my point was to emphasise that some FIMOs, like the cherry one used here, have transparent parts that cover the base colour. If I had chosen a dark coloured base, and if the FIMO is too thick (they come in varying thickness sometimes), then it would look quite odd (if you can imagine). Here, layering Teenage Dream over everything made the contrast less obvious, but still observable. But I believe most people do not look closely enough to be able to tell the difference ;)


Frontal view of cherry with Teenage Dream! Oh the bling!! =^_^= Makes the cherry looks shiny and juicy too haha.


Here is a picture of the flower with the squarish glitters from the nail art pen. Doesn't go too badly with the red specks, yes? =)


And so I headed out of the house. By the time I got into the car, one-and-a-half petal of the flower FIMO fell off!! I was super upset.


Root cause? An earlier photo tells the story:


The lower petals were not glued properly onto the nail! The thing about FIMO is that it is FLAT and very difficult to bend, whereas most parts of our nails are curved. And if you have not-so-big nails like me, then you would be hard pressed for a place to put your FIMO if you want it to adhere completely. Oh well. So when I got home, I went to stick another FIMO on the sad half-FIMO as such:


So this is a close-up on the final result of my first venture with FIMO:


Do y'all have any tips and advice to share? I would be glad to know more before I embark on my subsequent adventures with FIMO (since I still have hundreds of pieces)!


More soon! =D

xoxo
jayo